

How to Lower and Adjust Mika Micky Bassinet Height: Step-by-Step Guide for Safe Sleep Positioning
One of the most valuable features of the Mika Micky bedside bassinet is its adjustable height system, which allows you to position the sleep surface exactly level with your mattress for safe co-sleeping access. Whether you’re moving the bassinet to a different room, switching from a platform bed to a box spring setup, or simply need to lower the height as your baby grows, understanding the adjustment mechanism ensures you can make changes confidently without compromising stability.
We designed our bassinet with a straightforward height adjustment system that requires no tools and takes just minutes to complete. This guide walks you through how to lower mika micky bassinet height, raise it back up when needed, and verify that every setting locks securely before your baby sleeps in the repositioned unit.
Locating the Height Adjustment Mechanism
The Mika Micky bassinet uses a button-release system built into each of the four leg assemblies. You’ll find a round push-button on the outer side of each leg, positioned roughly eight inches from the floor when the bassinet is at its lowest setting.
Before attempting any height change, clear the bassinet of all bedding, toys, and your baby. The unit should be completely empty so you can handle it safely without worrying about contents shifting during adjustment. Place the bassinet on a flat, stable surface with enough clearance around all four sides for you to access each leg comfortably.
Run your hand along each leg to confirm you can feel all four buttons. They’re spring-loaded, so pressing one in should produce a slight click and immediate release when you let go. If any button feels stuck or doesn’t spring back, stop and inspect that leg for obstructions or damage before proceeding.
Lowering the Bassinet Step by Step
To lower the height, you’ll press and hold the adjustment button on one leg while gently applying downward pressure to that corner of the bassinet frame. The leg will slide downward through its track, moving in roughly one-inch increments as it passes each locking notch.
Work on one leg at a time rather than trying to adjust multiple corners simultaneously. Press the button, lower that leg to your desired notch, then release the button and give the leg a firm upward tug to confirm it has locked into place. You should hear and feel a distinct click as the internal pin engages the notch.
Repeat this process for the remaining three legs, lowering each to the same notch position to keep the sleep surface level. Our bassinet offers seven height settings spanning approximately twelve inches of total adjustment range, so count the clicks carefully if you’re moving multiple notches at once. The same principle you followed during initial setup when you learned how to assemble your Mika Micky bassinet applies here: always verify each leg independently before trusting the entire frame.
Verifying Level Positioning and Lock Engagement
Once all four legs are adjusted, place a carpenter’s level or a smartphone leveling app across the bassinet’s sleep surface in both directions—side to side and head to foot. The bubble should rest centered, or your app should read within one degree of true level.
If the surface tilts noticeably, one or more legs didn’t lock at the correct notch. Identify which corner sits higher or lower, then re-adjust that leg by pressing its button and repositioning it to match the others. A bassinet that tilts even slightly can cause your baby to roll toward one end, which compromises the safe sleep environment you’re working to create.
Test the Stability
After leveling, perform a stability test before returning your baby to the bassinet. Press down firmly on each corner of the frame with about ten pounds of force. The legs should remain rigid with no downward slide or wobble. Gently rock the bassinet side to side; properly locked legs will hold the frame completely steady. According to the general design standards for bassinets, a stable base is essential to prevent tipping and ensure the structure can support your baby’s weight and movement safely throughout the night.
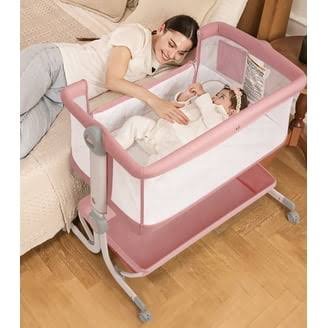
Adjusting Height to Match Your Bed
The primary reason to lower or raise the Mika Micky bassinet is to align its sleep surface with your own mattress top. Measure from your bedroom floor to the top of your mattress, then adjust the bassinet so its mesh sleep surface sits within one inch of that height.
This close alignment lets you reach your baby without sitting fully upright, which makes nighttime feedings and soothing far less disruptive to your own sleep. When the surfaces are level, you can also keep one hand on your baby while resting your arm comfortably on your mattress, which many parents find reassuring during the early weeks.
If you use a mattress topper, thick comforter, or pillow-top mattress, measure to the actual surface where you sleep rather than the base mattress. The goal is practical access, not perfect mathematical alignment. Test the height by lying in your normal sleep position and reaching over; you should be able to touch your baby’s chest without straining your shoulder or wrist.

When to Adjust Height as Your Baby Grows
Many parents start with the bassinet at its highest setting for the first few weeks when their newborn sleeps most of the day and night. As your baby becomes more active and begins to push up on hands and knees—typically around four to five months—you may want to lower the bassinet to reduce the distance to the floor in the unlikely event of a tip or fall.
Our bassinet is rated for use until your baby reaches fifteen pounds or begins to push up on hands and knees, whichever comes first. If your baby is approaching either milestone, lowering the sleep surface one or two notches provides an extra margin of safety without requiring you to transition to a crib immediately.
Some families also adjust height seasonally. Lowering the bassinet in summer can improve airflow around your baby, while raising it in winter might position them farther from cold floor drafts if your bedroom has poor insulation. These are small comfort adjustments rather than safety requirements, but the flexibility is there when you want it.
Keeping Your Bassinet Adjusted for Comfort and Safety
Learning how to lower mika micky bassinet height gives you the flexibility to adapt your baby’s sleep space as your needs change, whether you’re moving rooms, switching beds, or simply optimizing the setup for easier nighttime care. The adjustment system is designed to be intuitive and tool-free, but it still requires attention to detail—always work with an empty bassinet, verify that every leg locks positively, and confirm the sleep surface is level before your baby uses it again.
We built this bassinet to grow with your family through those first critical months, and height adjustment is a key part of that adaptability. Check the locks regularly, keep the leg tracks clean, and don’t hesitate to re-adjust whenever your situation changes. A bassinet that fits your bed perfectly makes nighttime parenting smoother and safer for everyone.
Notes
The bassinet provides seven distinct height positions, spaced approximately two inches apart. This gives you about twelve inches of total vertical adjustment range, which accommodates everything from low platform beds to high traditional box spring setups.
Each setting locks positively, so you’ll feel and hear a clear click when the leg engages a notch. The range covers most standard bed heights, though unusually tall or low bed frames may require creative positioning.
No, always remove your baby and all bedding before adjusting the height. The adjustment process requires you to press buttons and apply pressure to the frame, which could shift unexpectedly if you’re holding it at an angle or supporting weight unevenly.
Adjustment takes only a few minutes once the bassinet is empty, and the safety benefit of working with an unloaded unit far outweighs any convenience of leaving your baby in place.
First check for any visible obstruction around the button or in the leg track. Dust, fabric fibers, or small debris can sometimes jam the spring mechanism. Wipe the area clean with a dry cloth and try again.
If the button still feels stuck, inspect the leg for bending or damage. A bent leg tube can pinch the internal mechanism and prevent the button from moving. Do not force it—contact our support team for a replacement leg assembly if cleaning doesn’t resolve the issue.
The most reliable method is to place a level across the sleep surface after adjustment and confirm the bubble centers in both directions. Visually, you can also crouch down and sight along the bottom edge of the bassinet frame—if one leg appears shorter, that corner will sit noticeably lower.
Another quick test is to press down on each corner with equal force. If one corner compresses or wobbles more than the others, that leg may not be fully locked. Re-adjust any leg that feels unstable.
Yes, you can use any of the seven height settings from day one as long as the sleep surface aligns with your bed and the unit remains stable. The lowest setting isn’t reserved for older or heavier babies—it’s simply there to accommodate low bed frames.
Choose the height that makes nighttime access comfortable for you. There’s no safety advantage to starting high and working downward unless your bed height changes or your baby’s increasing mobility prompts a precautionary adjustment.
Inspect the leg locks each time you move the bassinet to a new location or after any significant bump or jostle. Under normal stationary use, the locks will hold indefinitely, but it’s wise to give each leg a firm upward tug once a week as part of your routine bassinet check.
If you ever hear an unusual click or notice the bassinet sitting lower on one side, stop use immediately and verify that all legs remain locked at their intended notches. Relocking a leg takes only seconds and ensures your baby’s sleep surface stays level and stable.