

How to Disassemble Your Mika Micky Bassinet: Step-by-Step Breakdown Guide
Whether you’re preparing for storage, moving to a new home, or simply need to deep-clean your bassinet, knowing how to disassemble your Mika Micky bassinet properly protects both the product and your peace of mind. Our bassinets are engineered for tool-free assembly and disassembly, but the process still benefits from a clear sequence.
This guide walks you through each stage of taking apart your bassinet, from detaching the fabric components to breaking down the frame itself. We’ve designed our hardware and connection points to withstand repeated assembly cycles, so you can confidently disassemble and reassemble as often as your family’s needs require.
Preparing Your Workspace and Gathering What You Need
Clear a flat surface large enough to lay the bassinet on its side — a carpeted floor or padded area works best to avoid scratching the frame. You won’t need tools for disassembly, but keep a clean cloth nearby to wipe down metal connectors as you go, and a large bag or bin to hold screws, clips, and small hardware pieces together.
Remove all bedding, sheets, and accessories from the bassinet before you begin. Check pockets and storage compartments for any stray items. If you plan to store the bassinet long-term, this is also the moment to snap a few photos of the assembled unit from multiple angles — those reference images make reassembly far easier months later.
Detaching the Fabric Sleep Surface and Side Panels
Start by unzipping or unhooking the mattress pad from its attachment points. Our fabric components typically secure via a combination of zippers along the perimeter and elastic loops or snaps at the corners. Work your way around the bassinet methodically, releasing one fastener at a time rather than pulling the entire panel free in one motion.
Once the mattress pad is off, locate the clips or Velcro straps that hold the mesh or fabric side panels to the frame. These usually sit at each corner post and sometimes at mid-span points along longer sides. Gently press the release tab on each clip or peel back the Velcro, then slide the fabric panel upward and away from the frame. If a panel resists, double-check for a hidden fastener rather than forcing it — our designs avoid stitching fabric directly to metal, so every attachment point should release cleanly.
Breaking Down the Frame and Legs
With all fabric removed, you’re left with the bare frame. Our bassinet frames use a folding or sliding-tube mechanism at the leg joints. Look for a button, lever, or squeeze-release clip near each leg’s connection point to the main frame body.
Press or squeeze the release mechanism, then pull the leg straight out or fold it inward depending on your model’s hinge design. Repeat for all four legs. If your bassinet features a height-adjustment system, lower it to the shortest setting before attempting to remove the legs — this reduces tension on the locking pins. The same joint principles that allow you to fold and store your bassinet compactly also govern disassembly; understanding one process reinforces the other.
Some Mika Micky models include a cross-brace or stabilizer bar beneath the sleep surface. This piece typically slides out of brackets once the legs are detached. Slide it horizontally toward one side until it clears the bracket, then lift it free. Keep all disassembled frame pieces together in one area so nothing gets misplaced during the process.
Handling Wheels, Swivel Locks, and Accessory Attachments
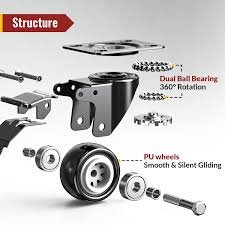
If your bassinet has caster wheels, check whether they’re press-fit or screw-mounted. Press-fit wheels usually have a small button on the wheel housing — press it while pulling the wheel straight down and away from the leg. Screw-mounted wheels require a screwdriver, which is the rare exception to our tool-free claim.
Swivel locks and brake mechanisms are typically integrated into the wheel assembly, so removing the wheel removes the lock as well. If your model includes detachable storage pockets, toy bars, or other accessories clipped to the frame, remove those now. Most accessory clips slide onto frame tubes and can be pulled off once you’ve released a small spring-loaded pin or tab. According to industry standards for infant sleep products, any component that can be detached should be stored separately from the main unit to prevent accidental entrapment or pinch hazards during storage.

Cleaning and Inspecting Components Before Storage
Once disassembled, wipe down all metal frame pieces with a damp cloth to remove dust and prevent corrosion during storage. Check each joint and locking mechanism for wear — small cracks in plastic clips or bent metal tabs should be noted and addressed before the next assembly.
Fabric panels and the mattress pad can be hand-washed or machine-washed per the care label instructions. Let everything air-dry completely before packing it away. Store disassembled parts in a labeled bin or the original packaging if you kept it. Place small hardware like clips and screws in a sealed bag taped to the inside of the bin, so they don’t scatter.
If you anticipate needing to reassemble the bassinet soon, refer to the reverse sequence of these steps — or consult our detailed guide on how to assemble your Mika Micky bassinet, which covers the same connection points from the opposite direction.
Disassembly Confidence for Every Stage
Taking apart your Mika Micky bassinet doesn’t require special skills or tools — just a methodical approach and a few minutes of focused attention. By following the fabric-first, frame-second sequence we’ve outlined here, you protect both the product’s longevity and your own efficiency.
Whether you’re packing the bassinet away for a future sibling, preparing it for a deep cleaning session, or simply troubleshooting a wobbly leg, understanding how each component connects and releases gives you full control over the product you’ve invested in. We designed every joint and fastener with repeated use in mind, so disassemble and reassemble as often as your family’s needs demand.
Notes
No tools are required for most disassembly steps. Our bassinets use button-release, clip, or slide mechanisms at every major joint. The only exception is if your model has screw-mounted caster wheels, which need a screwdriver.
All fabric attachments, leg joints, and frame connectors are designed for hand operation only. Keep a clean cloth handy for wiping down parts, but leave the toolbox closed.
Run your hand along the entire perimeter of each fabric panel, feeling for snaps, clips, or Velcro patches. Our designs typically place fasteners at corners and mid-span points, never randomly.
If a panel resists after you’ve released what you think are all the attachment points, stop and inspect rather than pulling harder. Forcing fabric off a hidden fastener can tear the material or bend the clip.
You can start the disassembly process in place, but once you remove the fabric components and begin breaking down the frame, you’ll want a larger clear area. Legs and frame pieces are easier to handle on the floor than while standing.
If space is tight, remove the fabric panels and mattress pad first, then carry the bare frame to a more open room before detaching the legs.
Use a large plastic bin with a lid, and tape a small ziplock bag of screws, clips, and fasteners to the inside wall of the bin where you can see it. Label the bin clearly with the product name and date of disassembly.
Store the bin in a dry, climate-controlled area. Avoid garages or attics where temperature swings and humidity can corrode metal parts or encourage mold on fabric.
Our bassinet joints are rated for dozens of assembly cycles under normal use. If you’re disassembling for storage once or twice a year, the hardware will outlast the product’s useful lifespan.
Inspect each joint and clip after every few cycles. Replace any cracked plastic or bent metal parts immediately — we sell replacement hardware kits for exactly this purpose.
Washing after disassembly is easier and more thorough. Once the fabric panels are off the frame, you can machine-wash them per the care label without worrying about soaking metal parts or trapped moisture in joints.
If you’re storing the bassinet long-term, washing after disassembly also ensures everything is clean and dry before it goes into the bin.